English
 中文简体
中文简体 русский
Every pet owner has seen that telltale sign when their animal figures out grooming is coming up—the quick dash under the couch, ears pinned back flat, or that fast, worried breathing that shows real unease. A lot of times this comes from earlier times when regular brushes tugged hard on knots, clippers buzzed too close and felt scary against the skin, or sessions got hurried and left bad memories tied to the whole process. Bringing in the Opey Pet Knot Untying Comb with careful, thoughtful handling tackles the actual hurt that sets off the fear while slowly helping your pet learn that grooming can feel okay through short, kind sessions. Turning a pet who ducks and hides into one that stays relaxed takes getting why the anxiety starts—things like extra-sensitive skin, not being used to touch early on, or tools that grab and pull instead of sliding smoothly because of stiff tines or rough spots. Plenty of people think their pet is just stubborn or fussy about grooming, but more often it traces back to those sensory triggers, missing gentle introductions when young, and equipment that unintentionally causes sharp tugs or snags.
What Grooming Anxiety Looks Like and Why Immediate Action Matters
Grooming anxiety shows up in clear behavioral and physical ways, from quiet hints to obvious distress. A dog may start panting hard even when the room is cool, or a cat might let out sharp, repeated cries that sound nothing like their usual meows. You might notice shaking, desperate tries to get away, swatting or biting to defend themselves, or a total freeze where the pet goes stiff and still—all signs the animal sees grooming as something dangerous. In some cases, pets grow so afraid that just spotting the brush or clippers makes them run and hide long before anything touches their fur.
The causes usually come from bad past moments. A young dog that had mats yanked out roughly learns fast that brushes mean sharp tugs and pain. Kittens who missed gentle handling in their early weeks often find even soft touches too much. Other things make it worse—the loud buzz of clippers, strong smells from sprays, or the cold feel of metal against skin can all set off fear. Hidden health issues play a part too; brushing over sore, inflamed skin causes real pain, which makes the pet avoid it even more.
What is grooming anxiety and how can I recognize it in my pet?
Grooming anxiety is a fear response pets learn when they connect grooming tools or handling with stress, discomfort, or pain. Look for repeated avoidance (running off when supplies come out), clear stress during sessions (wide eyes, tucked tail, lots of drooling), pushback (squirming away, yowling, trying to bite or scratch), and body signs (fast breathing, pounding heart you can feel, extra fur falling out from stress). It ranges from slight hesitation to full panic.
Why does my pet panic at the sight of a brush or comb?
The panic comes from classical conditioning—the pet's mind ties the sight of the brush to something bad that happened before, like pain or being held down. Even a single rough session can create a strong, lasting link. Pets are also quick to pick up on patterns; they notice when you start collecting tools or change how you move, so worry builds up ahead of time.
The stakes go beyond short-term upset. When pets keep avoiding grooming, mats get worse, pulling tighter against the skin and hurting with every step. Bad mats trap dampness and germs, leading to infections that need a vet. The problem snowballs—grooming turns into something that's both more needed and more frightening, sometimes ending with the pet needing sedation just for a trim. Owners feel growing frustration, and the trust between pet and person takes a real hit when care becomes a struggle.
Studies in animal behavior show that careful, step-by-step desensitization paired with counterconditioning reliably lowers fear. Habituation teaches the nervous system the old "threat" is now safe. Counterconditioning links the trigger to good things (like treats or favorite play), creating fresh positive feelings. These methods work for dogs, cats, and others, but they demand steady effort and time to replace old fear memories.
Consider Max, a three-year-old golden retriever who developed severe grooming anxiety after a painful dematting session at two years old. His owner noticed increasing resistance during home brushing, escalating from mild pulling away to defensive growling when the slicker brush appeared. By the time professional help was sought, Max required muzzling for basic grooming—a clear indicator that previous approaches had failed to address the underlying fear. Alternatively, Luna, a long-haired cat, began hiding under beds whenever her owner prepared grooming supplies. Her anxiety manifested differently—through avoidance rather than aggression—but stemmed from similar roots: repeated experiences where grooming meant uncomfortable pulling on mats behind her ears.
How to Read Your Pet's Signals Before You Start
Can grooming cause physical harm, and how do I know whether a tool is painful? Grooming can definitely hurt your pet if it's done the wrong way or with tools that aren't right for the job. You can end up with scraped skin from pointy comb ends, bruises from pushing too hard, broken hairs that lead to worse knots, or pulled skin when mats get yanked out. You'll know a tool feels painful if your pet jerks back right away, makes noise when you use normal pressure, ends up with red or sore-looking skin afterward, or fights harder every time you try grooming. Gentle tools have smooth, rounded tips that won't cut skin, some give or bend so they don't press too hard, and shapes that follow the way the coat naturally lies.
Before you pick up any grooming tool and move toward your pet, take a moment to check how they're feeling by watching these clear signs:
Immediate stop signals:
- Body locked stiff with tight muscles you can see
- Fast, open-mouth panting (especially in dogs)
- Ears pressed flat to the head
- Whale eye where the whites show a lot
- Quick lip licks or big yawns (classic dog stress cues)
- Tail clamped tight or whipping around wildly
- Lunging to bite or swipe at the tool
- Sharp yelps, hisses, or long, drawn-out cries
Moderate concern signals that mean slow down:
- Head turning away over and over
- Leaning or stepping back to get distance
- Quiet growling or rumbling sounds
- Whiskers pulled back flat (in cats)
- Staring hard at the comb instead of settling
- Small tugs away without trying to escape completely
What immediate steps should I take if my pet panics during grooming?
Stop brushing or combing the instant it happens and put the tool completely out of sight. Step back a few feet to give them space so their body can start to calm. Keep your voice low and even—avoid high-pitched soothing or excited tones that can make the fear stick—using simple words like "we're finished" or "that's all for now." Only give a really good treat once they look relaxed again (mouth closed, breathing normal, ears up in a neutral spot), because treats given during full panic can accidentally teach them the fear is okay. Leave it alone for hours or even until tomorrow, and when you try again, begin with something much easier, like just letting them see the tool from far away.
While you're grooming, keep an eye on breathing and heart rate. A relaxed dog at rest takes about 10 to 30 breaths per minute with steady chest movement (it changes a bit by size), but stress makes breaths quick and shallow. Rest your hand lightly on their side—you should feel a calm, even heartbeat, not one that's pounding fast. Cats are different; open-mouth breathing almost always means they're really stressed, because calm cats breathe only through their nose.
Choosing Tools That Minimize Pain and Fear
Which comb or tool causes the least pulling on mats and tangles?
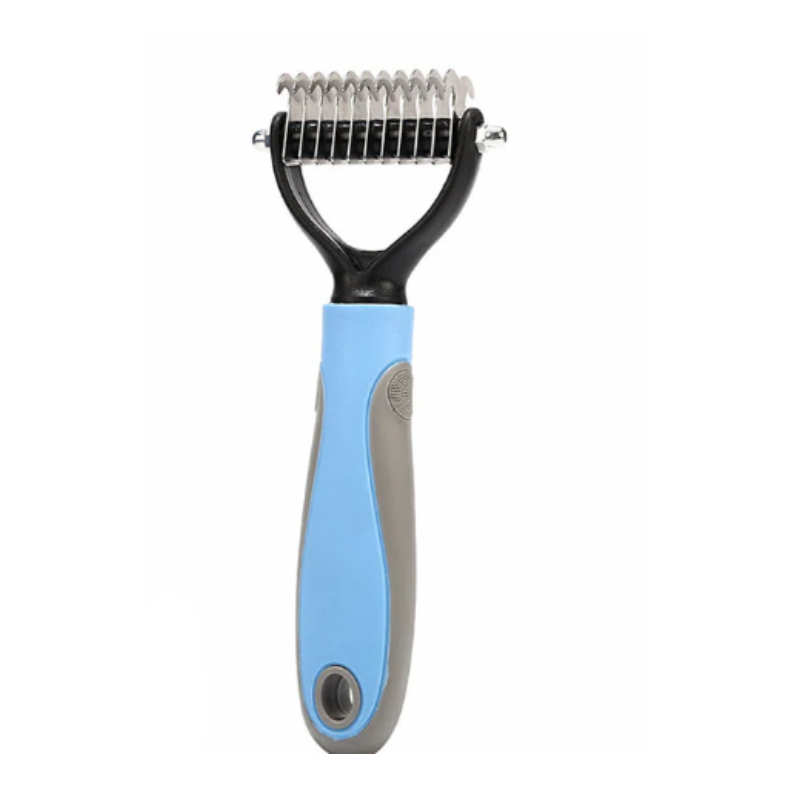
Tools with teeth that rotate or pivot on their own pull far less since each tine can shift when it hits a knot instead of forcing through. Rounded, smooth tips stop scratches, and good spacing keeps hair from jamming up inside. Start with wide-tooth combs that have some flex for working out early tangles; save dematting rakes with notched edges for only the toughest spots and handle them very carefully. Slicker brushes, even though lots of people use them, tend to hurt more because all those tiny, tight wires rub hard against skin and coat at once.
The mechanical features that distinguish gentle tools from painful ones include:
Critical design elements:
- Rounded tooth tips with no sharp points that could nick skin
- Rotating or moving tines that follow resistance in the coat
- Polished metal that slides easily without snagging
- Wide gaps between teeth (about 5-10mm) for starting on tangles
- Flexible heads that bend to match the pet's shape
- Comfortable, padded handles that help you avoid gripping too tightly
Different coat types need different tools. Short coats (like boxers, beagles, or shorthair cats) do best with soft rubber curry combs or grooming mitts that lift loose fur without scraping. Medium coats (goldens, Maine coons) work well with wide-tooth combs to untangle first, then a softer slicker to smooth everything. Long, flowing coats (Yorkies, Persians) need the gentlest wide-tooth combs at the start and careful steps from there. Double coats (huskies, Pomeranians) usually need undercoat tools plus regular combs, but go slow.
| Tool Type | Coat Type | Primary Function | Pain Risk Level |
|---|---|---|---|
| Rotating-tooth detangling comb | All lengths, especially prone to mats | Initial knot separation | Low — teeth move with resistance |
| Wide-tooth metal comb | Medium to long coats | General detangling, checking for remaining mats | Low to moderate — depends on technique |
| Slicker brush (fine) | Short to medium coats, finishing only | Removing loose undercoat, smoothing | Moderate — may cause brush burn |
| Dematting rake | Long coats with severe mats | Splitting stubborn tangles | Moderate to high — sharp edges |
| Rubber curry brush | Short coats | Loose hair removal, massage | Very low — soft and flexible |
| Undercoat rake | Double-coated breeds | Removing dead undercoat | Moderate — requires light pressure |
Before you use any Pet Knot Untying Comb, look it over closely. Run your finger along every tooth tip—it should feel completely smooth and rounded with no rough spots or catches. Make sure the teeth line up evenly with no bends or crossings. Check painted or coated metal for chips that might leave sharp metal showing underneath. Gently flex the head to see that it moves enough to spread pressure but isn't so loose you lose control.
Building a Pre-Grooming Foundation Your Pet Can Trust
Creating successful grooming experiences begins days before you attempt actual brushing. Desensitization means slowly letting your pet get used to every part of grooming in small, safe steps so their body learns there's no danger. You can't hurry this—trying to squeeze weeks of careful work into one day almost always backfires and can make fear worse.
Start by just letting them see and smell the Pet Knot Untying Comb with nothing else happening. Leave the comb on the floor in a spot your pet already likes to hang out. When they walk over and check it out, give them a really tasty treat right away (tiny bits of chicken, cheese, or their favorite). Do this over several short times until they start going to the comb on their own, looking for the reward. Next, hold the comb and rest it lightly against their shoulder for just a second—no brushing—then treat immediately. Slowly build up how long it touches and try different spots on their body.
Environmental factors significantly influence grooming success. Pick a quiet spot away from foot traffic and other pets so there's no extra stress or competition. Make sure the room has good light so you can clearly see the skin and coat. Keep the temperature comfortable—pets who resist grooming when it's hot often do much better in a cool space where they aren't already overheated. Put down a non-slip towel or mat so they don't feel like they're sliding, which can spike anxiety fast.
Sensory supports provide additional calming influences. Plug-in pheromone diffusers made for dogs or cats release calming scents that mimic natural ones, though not every pet responds the same. Play soft classical music or run white noise to cover up sudden household sounds that could startle them. Place something familiar nearby—like their unwashed blanket or a shirt you've worn—so the smell feels safe.
Session duration proves far more critical than many owners recognize. A short, calm five-minute session builds trust, but a long, forced half-hour fight can set you back weeks. Start with very brief sessions—even just two minutes—and always stop while your pet still looks relaxed. The goal is to quit before any stress shows, not to push past it.
Sample 7-day desensitization schedule:
Day 1-2: Place Pet Knot Untying Comb near feeding area; allow investigation without interaction - reward any interest with treats
Day 3-4: Hold comb in hand while petting pet normally; touch comb to shoulder for 1-2 seconds - immediate treat after each touch
Day 5: Comb touches three body areas (shoulder, back, hip) for 2-3 seconds each - treat after each area
Day 6: Make three gentle strokes on least-sensitive area (usually shoulder/back) - treat after stroke set
Day 7: Complete 5-minute session on one body section only - multiple treat rewards throughout
This timeline assumes a moderately anxious pet with no severe trauma history. Heavily traumatized animals may need weeks at each stage.
Step-by-Step Technique for Pain-Free Detangling
Effective grooming begins with thorough assessment before the comb touches coat. Look over the whole body carefully first, spotting where mats are, checking skin for redness, swelling, or soreness, and noticing any spots your pet guards or tries to hide. Split the fur into sections so you can see the skin underneath—hot spots, rashes, bugs, or cuts mean stop brushing and call the vet. Keep track of what you see so you can plan: start with the easy parts and save the hardest ones for last while you're still patient.
The foundational principle for mat removal involves working from the outside of the tangle toward the skin, never the reverse. Trying to pull a comb from the skin out through a mat hurts the most and can tear skin if it slips. Instead, use your other hand to hold the fur right at the base near the skin—this stops the tug from reaching the body. Use your fingers first to carefully pull apart the outer parts of the knot, loosening single strands before you even use the comb.
When using a rotating-tooth detangling comb, angle matters significantly. Keep the comb almost flat against the body (around a 30-degree angle) instead of straight up and down—this cuts down on pressure. Use very little force; the tool should do most of the work. Work in tiny strokes, just a few centimeters long, going over the same small spot again and again until it gives. You should see the teeth spin as they hit resistance—if they don't move, you're pushing too hard or need a different approach.
Breaking down a stubborn mat layer by layer:
- Finger work phase: Take 30-60 seconds to use your fingertips and softly separate the outside edges of the tangle, moving along the way the hairs naturally part
- Wide-tooth comb phase: Start with the rotating-tooth comb right at the mat's outer edge, doing 3-5 very light strokes to free up those first layers
- Assess and repeat: See how much smaller the mat looks now; go back and repeat steps 1-2 on the next layer underneath, working little by little closer to the skin
- Dematting rake consideration: When you hit a wall and can't make more progress, place a mat splitter carefully to split the knot into smaller pieces—keep the cut directed away from the skin at all times
- Strategic trimming: Save this for when every other method fails—hold blunt scissors flat and parallel to the skin, keep your fingers between the blades and the pet's body for protection, and cut the mat away in small sections
Sensitive zones—belly, armpits, groin, tail base, behind ears, and face—demand modified approaches. These spots have thinner skin, almost no fat cushioning underneath, many nerve endings, and constant movement, so handle them with extra caution. Brush the belly while your pet stays in whatever stance feels comfortable to them (standing works better than forcing them onto their back), and limit time to just that one spot. For armpits, hold one hand under the leg to lift it gently while the other hand does quick, short strokes without stretching the skin tight. On the face, steady your comb-holding hand by resting it against the top of their head—this keeps things stable and stops accidental pokes near the eyes if they shift suddenly.
Sample 15-minute grooming session:
Minutes 0-2: Settling phase - pet enters grooming area voluntarily, receives treats, light petting without tools
Minutes 2-5: Shoulder and back region - gentle combing with frequent praise and occasional treats
Minutes 5-8: One side of body from shoulder to hip - addressing any small tangles encountered
Minutes 8-11: Second side of body, matching first side's work
Minutes 11-13: One sensitive area only (behind one ear OR part of belly) - very gentle, ready to stop
Minutes 13-15: Finishing touches on easy areas, positive end experience, final high-value treat
Minute 15: Session ends regardless of completion status - successful stop point prevents overtaxing tolerance
When pets begin struggling despite proper technique, assess whether continuation serves any purpose. Some pushback is only short-lived discomfort that fades if you stay gentle, but stronger panic shows you've gone beyond what they can take right now. Safe, humane restraint for grooming should involve minimal force—one arm loosely wrapped around the chest or a calm helper supporting the pet without holding them down hard. Using heavy force flips on the fight-or-flight switch and ruins trust. Pause-and-reassess rules mandate stopping whenever you observe sustained struggle beyond ten seconds, vocalizations increasing in intensity, or attempts to bite that persist after you've eased pressure.
Troubleshooting common events:
- Comb snags on tangle: Stop pulling right away; pull the comb back out gently by reversing the direction of your stroke with the same light pressure; try coming at the snag from a new angle
- Pet tenses suddenly: Stop all movement instantly; hold the comb still where it is without pushing or pulling; wait until the muscles loosen up before you decide to keep going or take it away
- Skin reddening appears: Stop working that spot completely; put a cool compress on if it looks irritated; stay away from the area for at least 48 hours
Pairing Grooming with Rewards That Build Tolerance
Positive reinforcement operates on precise timing—rewards delivered within 0.5 to 2 seconds of desired behavior create strong associations, while delayed rewards confuse the learning process. During grooming, this means treating immediately after your pet displays calm acceptance, not minutes later when the session concludes. High-value treats (real meat, cheese, specialized training treats) should be reserved for challenging moments and significant tolerance milestones. Lower-value options (regular kibble, standard treats) work for routine calm behavior during easy sections.
Variable reinforcement schedules—where rewards arrive unpredictably rather than after every single action—create more durable learned behaviors. Begin with continuous reinforcement (treat after every few calm strokes) during initial conditioning, then gradually shift to intermittent delivery. Your pet never knows which moment brings a reward, maintaining engagement and effort throughout the session. This mirrors how slot machines generate persistent behavior through unpredictable payoffs.
Incorporating simple cues and commands adds structure that anxious pets often find reassuring. Ask for a familiar behavior like "sit" or "paw" before beginning grooming, rewarding compliance, then proceeding to brushing. This sequence establishes a predictable routine that reduces uncertainty. Clicker training enthusiasts can mark calm moments with a click sound followed immediately by treats, though verbal markers ("yes" or "good") work equally well for most handlers.
Distraction pairing transforms grooming from an isolated stressful event into part of a larger positive experience. For cats, introduce a favorite interactive toy immediately after grooming completion, building an association between enduring brushing and engaging in play. For dogs, food-puzzle toys presented post-grooming provide mental stimulation rewards. Some handlers successfully use lick mats spread with peanut butter or wet food during grooming sessions themselves—the licking action provides calming effects while creating pleasant simultaneous associations.
Gradual tolerance building requires systematically increasing difficulty across sessions. Early sessions might address only one body area for five minutes. Next sessions add a second area or extend duration to seven minutes. Eventually you incorporate more challenging regions or tackle minor tangles. This progression prevents overwhelming your pet's coping capacity while steadily expanding what they accept as normal.
Example reward progression plan:
Weeks 1-2: High-value treat (chicken) after every 30 seconds of calm grooming; session ends with play
Weeks 3-4: High-value treat after every 60 seconds; variable introduction (sometimes 45 seconds, sometimes 90)
Weeks 5-6: Mix of high and medium-value treats on variable schedule; treats become less frequent but remain unpredictable
Weeks 7+: Occasional high-value surprise treats; primarily verbal praise and petting; play/toy reward remains consistent post-session
Common Mistakes That Undermine Progress
Forcing extended grooming sessions when visible stress signals appear represents the single most damaging error owners make. It feels logical to think "these mats have to come out now," but the emotional damage far outweighs getting the job done quickly. One rough, pushed-through session can erase weeks of gentle progress and bring back strong fear that takes months to undo. The right fix is to cap every session at a short length no matter how much is left, understanding that spreading the work over several brief days gets the same results without hurting your pet's trust.
Using tools inappropriate for your pet's specific coat type or mat severity creates unnecessary pain. Fine-toothed combs meant for polished show coats hurt badly when forced through everyday tangles. Harsh slicker brushes pull out too much hair or scrape skin if used too often or too hard, giving pets every reason to resist. The solution is to carefully check what tools actually suit your pet's breed and current coat condition, then choose good-quality ones designed for that exact job instead of grabbing whatever is handy.
Ignoring underlying skin conditions while attempting grooming compounds both physical and behavioral problems. Allergies, fleas or other parasites, and hot spots all make brushing genuinely painful, so the pet learns grooming always means hurt. People set on clearing mats sometimes overlook red, swollen, or hot skin hidden underneath. The fix is to get a vet check right away whenever you notice skin looking off, constant scratching, bad smells, or extra touch-sensitivity in certain spots.
Over-brushing creates problems as significant as under-grooming. Brushing short coats every day with a slicker strips away natural oils and rubs skin raw, leading to something like "brush burn." Some owners go over and over the same patch in one go, leaving redness and soreness behind. Adjust by matching how often you brush to the coat type—short coats often need only weekly sessions, while long coats may need several gentle ones spread through the week.
Inconsistent routines prevent habituation from developing. Grooming only when mats get bad, then skipping for weeks, keeps the experience unpredictable and stressful instead of something the pet can get used to. Pets struggle to relax around something that happens so irregularly. Build steady, doable habits—even quick weekly sessions help tolerance grow much better than rare long ones.
Adapting Techniques for Special Populations
Senior pets present unique considerations combining physical fragility with established behavioral patterns. Arthritis can make old favorite positions painful, so a dog that used to lie on their side might need to stay standing now. Thinner skin tears more easily, calling for softer touch and close checks on tools for any rough spots. Brain changes in older pets can heighten worry when routines shift. Adapt with shorter times, soft padding underneath for support, and the same schedule every time so things feel familiar and safe.
Puppies and kittens benefit enormously from early, positive grooming exposure during their socialization period (roughly 3-14 weeks). Their focus lasts only minutes and their coats usually don't need much real work yet. Focus on making it fun rather than getting everything perfect—use very soft brushes, keep it light and playful, give lots of treats, and stop after 2-3 minutes while they're still happy.
Brachycephalic breeds (bulldogs, pugs, Persian cats) have respiratory compromise that makes stress particularly dangerous. They overheat fast and can't pant well to cool down. Groom these pets in a cool room, keep sessions very brief, watch closely for heavy panting or blue gums, and stop instantly if breathing looks hard.
Double-coated breeds require different approaches during shedding seasons versus maintenance periods. In spring and fall when they "blow" coat, you may need daily work to clear out thick undercoat, but in winter and summer weekly is usually enough. Use tools that reach the soft underlayer through the top guard hairs without harming either part. Hurrying this step often mats loose fur against the rest of the coat.
Pets with diagnosed skin conditions (allergies, seborrhea, infections) may have grooming temporarily contraindicated or requiring modified technique. Open, oozing hot spots need vet care before any brushing near them. Allergy flare-ups can turn even light grooming uncomfortable. Talk to your vet about the best time to start grooming again once treatment is underway.
Post-surgical animals recovering from procedures need grooming adapted to avoid incision sites and accommodate protective equipment like e-collars. Pain meds can hide signs of discomfort you'd normally notice, so stay extra careful. Hold off until your vet says the incision is healed enough for normal touching and handling.
Safety Protocols and Knowing Your Limits
Every grooming session requires a safety-first mindset that prioritizes injury prevention over aesthetic goals. Never run scissors or any sharp tool straight against the skin—the chance of slicing your pet if they suddenly shift is far too high. When you have to cut out a mat, keep the scissors flat and parallel to the body, slide your fingers underneath to shield the skin, and take off the mat in thin pieces instead of one big chop. Use electric clippers the same careful way, always with a guard set to keep the blade safely away from skin.
Check continuously for hot spots—painful, moist skin lesions that appear suddenly and worsen rapidly. They feel warm to touch and your pet will react strongly if you brush over them. Cease grooming in that region immediately and seek veterinary care, as infection can spread quickly. Similarly, any active bleeding whether from existing wounds or accidental scratching during grooming requires pressure application, cleaning, and professional assessment if it doesn't stop within minutes.
Recognize when to stop involves honest self-assessment. If you've spent fifteen minutes on the same mat with almost no change, pushing harder usually leads to frustration and rough handling that hurts your pet. If your pet's panic keeps building even though you're using gentle methods, going on breaks the bond you're trying to build. If you spot skin issues you don't understand, trying to groom past them risks making things much worse.
Tool hygiene prevents infection transmission and maintains functionality. After every session, pull out trapped hair from between the teeth with your fingers or a small pick. Wash everything in warm soapy water at least once a week or whenever it looks dirty. Dry tools completely before putting them away to stop metal from rusting. Look over tools often for bent teeth, wobbly parts, or chipped coating—throw away or replace anything that's worn instead of risking injury with a damaged tool.
Professional groomer intervention becomes necessary when mats are too severe for safe home removal, when pets require sedation for handling, or when your own skill level cannot match the coat's demands. Look for low-stress groomers who use fear-free methods like built-in breaks, lots of treats and praise, and calm steady handling. When choosing one, ask how they work with nervous pets, what training or certifications they have, whether they avoid force, and what they do if a pet gets upset. Ask to visit the salon ahead of time and meet the groomer—good ones are happy to show you around and answer questions.
Maintenance Strategies That Prevent Future Problems
Preventing severe mats requires far less effort than removing them, making maintenance routines essential for long-term grooming success. Daily touch sessions—even just running your hands over your pet's body while watching television—serve multiple purposes. You detect developing tangles when they're tiny and easily addressed. Your pet receives regular pleasant touch that normalizes handling. You monitor skin condition, finding lumps, injuries, or parasites early when treatment is simpler.
Weekly combing schedules vary by coat type but follow similar principles. Short coats need quick once-over sessions of five minutes using rubber curry brushes or grooming gloves to remove shedding hair. Medium coats benefit from ten-minute sessions with wide-tooth combs, paying extra attention to friction areas behind ears and under collar lines. Long coats demand 15-20 minute sessions twice weekly minimum, working methodically through sections to prevent any area from developing mats. Double-coated breeds need daily attention during shedding season, weekly during maintenance periods.
Seasonal considerations affect grooming needs significantly. Spring and fall coat changes in double-coated breeds produce enormous hair volumes requiring daily removal to prevent matting. Summer humidity increases mat formation in long-coated pets, necessitating more frequent sessions. Winter static can create tangles in fine coats. Adjust your routine based on seasonal coat behavior rather than maintaining identical year-round schedules.
Store grooming tools properly to maintain their condition and keep them accessible. Dedicated grooming supply containers prevent tools from getting lost or damaged in junk drawers. Keep combs and brushes clean and dry between uses. Replace tools showing wear—bent teeth, loose handles, or coating damage—rather than using compromised implements that can harm your pet.
Seven-Day Quick-Start Action Plan
Transforming grooming from stressful battle to manageable routine requires structured, incremental progress. This condensed plan provides immediate next steps:
Daily tasks: Handle your pet's coat gently for 30 seconds without tools; reward calm acceptance; note any tangles developing
Weekly session: Five-minute grooming on easiest body area only; rotate tool visibility exercises; track your pet's stress signals and improvement in a simple notebook
Before next grooming: Inspect comb for sharp edges; prepare high-value treats; ensure quiet environment available; review calming techniques
Immediate modifications: If current tool causes visible discomfort, stop using it; research appropriate alternatives for your pet's coat; consider professional guidance for severe mat situations
Track your progress through brief notes—date, duration, areas groomed, pet's response level, any challenges encountered. Patterns emerge quickly, showing which approaches work and which need adjustment. This record also helps when consulting professionals, providing concrete information about your pet's specific responses.
Grooming anxiety eases when you pair the right tool with steady technique and small, patient steps that match what your pet can handle emotionally. A well-designed comb takes away the pulling pain that builds fear, and careful desensitization brings back trust bit by bit. Success isn't about getting a flawless coat in one go—it shows up in tiny improvements, like staying put a little longer each time, until regular grooming becomes something neutral or even welcome for both of you.